How to improve AI agent(s) using DSPy
Technical walkthrough of how I improved an Agent for my project the “Auto-Analyst”
I’ve been working on something called “Auto-Analyst,” which is a data analytics system with four active agents. I gave them an initial prompt to get started, but their performance can be hit or miss — sometimes they do a great job, and other times not so much.
In this post, I will explore how I improved the performance of one of these agents using DSPy. DSPy if you don’t know is a LLM framework specifically designed to programmatically improve prompts and signatures for your LLM. So you can get a better performance without changing the LLM.
Overview of the Agent
In the Auto-Analyst system, there are four agents, each with a specific role:
Data Pre-processing Agent
Statistical Analytics Agent
Machine Learning Agent.
Data Visualization Agent.
In this post, I’ll share how I improved the performance of the second agent, the `statistical analytics agent`. As the name suggests, this agent takes user queries and turns them into Python code for statistical analysis. It’s built to work with the statsmodels library, which is one of the most popular for statistical programming in Python.
Note: This process can be generalized to any LLM program built using DSPy!
Auto-Analyst 2.0 - The AI data analytics system
Overview and open-sourcing the project
Initial Signature & Prompt
Below you can see the DSPy signature and prompt for the agent.
class statistical_analytics_agent(dspy.Signature):
    # Statistical Analysis Agent, builds statistical models using StatsModel Package
    """
You are a statistical analytics agent. Your task is to take a dataset and a user-defined goal and output Python code that performs the appropriate statistical analysis to achieve that goal. Follow these guidelines:

Data Handling:

    Always handle strings as categorical variables in a regression using statsmodels C(string_column).
    Do not change the index of the DataFrame.
    Convert X and y into float when fitting a model.
    Like this X.astype(float), y.astype(float)
Error Handling:

    Always check for missing values and handle them appropriately.
    Ensure that categorical variables are correctly processed.
    Provide clear error messages if the model fitting fails.
Regression:

    For regression, use statsmodels and ensure that a constant term is added to the predictor using sm.add_constant(X).

Seasonal Decomposition:

    Ensure the period is set correctly when performing seasonal decomposition.
    Verify the number of observations works for the decomposition.
Output:

    Ensure the code is executable and as intended.
    Also choose the correct type of model for the problem
    Avoid adding data visualization code.


    """
    dataset = dspy.InputField(desc="Available datasets loaded in the system, use this df,columns  set df as copy of df")
    goal = dspy.InputField(desc="The user defined goal for the analysis to be performed")
    code = dspy.OutputField(desc ="The code that does the statistical analysis using statsmodel")
    commentary = dspy.OutputField(desc="The comments about what analysis is being performed")
It takes in user query (goal) and dataset information, outputs code, and commentary (text information about what the code does).
The above prompt is mostly manually created by me, later in the post I will showcase the DSPy generated improved prompt.
Creating an Evaluation Dataset
An important component of DSPy optimization is having a set of queries that you can use to build a training and validation pipeline.
The first step is to just ask an LLM to give you questions for the agent to be used for evaluation. You need to tell the LLM what the agent does, what inputs it takes, and what kind of queries you expect the agent to receive (it is better to streamline this in code but it is easy to showcase using the ChatGPT interface)
To evaluate your AI system effectively, your test dataset should include most of the questions a user might ask. Since the agent works with CSV files (which will be different from your evaluation dataset), it’s a good idea to create evaluation questions for various CSV files.
If your AI agent is live and has a chat interface, it’s helpful to track which questions it answers correctly and which ones it doesn’t. You can then build an evaluation process around those queries. To expand your evaluation data, you could use a language model (LLM) to generate different variations of the same question. This helps create a broader set of test cases for evaluation.
The last step in building the evaluation dataset is to add the correct or expected response column. You probably need a human involved to get the right or expected answers. For this agent, I reviewed the generated response, fixed any errors, and personally checked if the code properly answered the query; if not I added the correct version.
Designing a Metric
How can we tell if the agent’s response is good? To figure this out, we need a way to measure its performance. You can create specific metrics based on what you need, or you can use existing ones like cosine similarity (which can measure the semantic similarity between generated responses and expected responses). For the statistical analytics agent, the metric should be able to do the following:
Check if the code runs
Check if the code is doing what the user intended
The first is easy to measure, just run the generated code from the agent. The second is tricky as user queries can be ambiguous. No matter how we measure the second part it will be imperfect or biased. In such a situation we should look for what most users prefer or how they write queries.
The scores on this metric can be 0, 50, 75, or 100. The “Data Handling” and “relevance” score were tested using a language model (LLM) to see if it correctly checked the data type in its response. This includes making sure that any necessary data type conversions are done properly.
Usually metrics on DSPy examples are less than 1, so in the end of the metric the score was divided by 100.
Struggling to get Agents to work properly?
How does prompt optimization work?
In this section, I will explain the high-level idea behind prompt optimization.
For additional resources, you can check out these visuals made by Michael Ryan (he is one of the graduate students working on DSPy)
First, you feed the evaluation training data (which includes queries and other inputs) into a student language model (LM) program. The student has a starting prompt and instructions that you’ve set up. The model processes the queries, and its performance is scored using the metric. Based on how well the student does, a teacher/instructor LM program creates new instructions for the student. The student then uses these updated instructions, and the process repeats several times. By the end, you end up with a set of instructions that perform the best according to your metric.
As long as the metric and training data are accurate in modeling & representing the problem you want the LM program to solve, this will generate better prompts than plain trial & error or random guess.
This is a broad overview of how optimization algorithms work. Here’s a breakdown of the key algorithms available in DSPy:
FewShot Generator Algorithms:
LabeledFewShot: This method creates a few examples (called demos) from labeled input and output data. You just need to specify how many examples (k) you want, and it will randomly pick k examples from the training set.
BootstrapFewShot: This uses a “teacher” module (which can be your program) to create complete demos for each stage of your program, plus labeled examples from the training set. You control how many demos to pick from the training set (max_labeled_demos) and how many new demos the teacher should create (max_bootstrapped_demos). Only demos that meet a certain performance metric are included in the final set. Advanced users can also use a different DSPy program as the teacher for more complex tasks.
BootstrapFewShotWithRandomSearch: This method runs BootstrapFewShot several times, trying out different random combinations of demos and selecting the best program based on optimization. It uses the same settings as BootstrapFewShot, with an extra parameter (num_candidate_programs) that defines how many random programs will be evaluated.
BootstrapFewShotWithOptuna: This version of BootstrapFewShot uses the Optuna optimization tool to test different sets of demos, running trials to maximize performance metrics and choosing the best ones.
KNNFewShot: This method uses the k-Nearest Neighbors algorithm to find the closest matching training examples for a given input. These similar examples are then used as the training set for BootstrapFewShot optimization.
COPRO: This method creates and improves instructions for each step of the process, using an optimization technique called coordinate ascent (similar to hill climbing). It keeps adjusting the instructions based on a metric function and the training set. The parameter “depth” controls how many rounds of improvement the optimizer will run.
MIPRO/MIPROv2: This method generates both instructions and examples at each step. It’s smart to use the data and examples already available. It uses Bayesian Optimization to efficiently search through possible instructions and examples across different parts of your program. MIPROv2 is more efficient, as it executes faster with lower costs.
Results
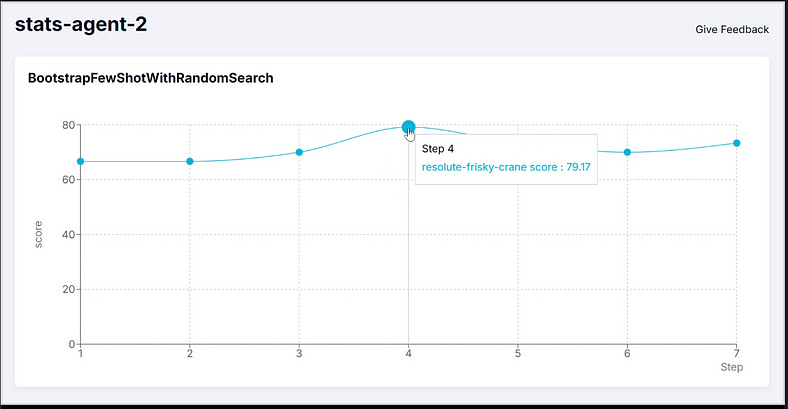
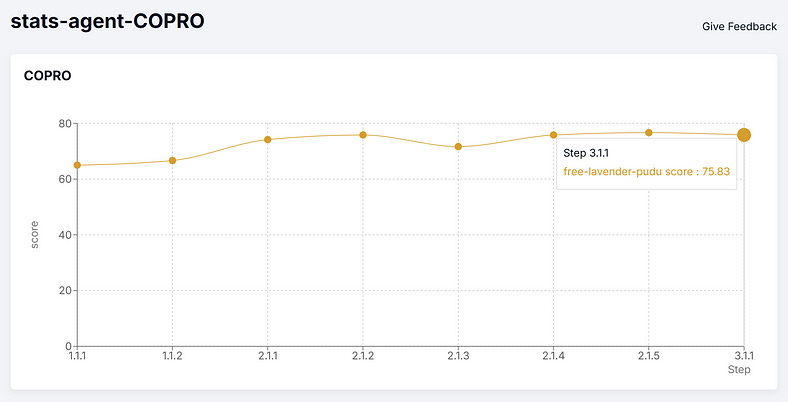
This section will show the results of both the score & optimized instructions for the `statistical_analytics_agent`. The optimizer used for this was BootstrapFewShotWithRandomSearch & COPRO. The first would find optimized fewshot examples to add in the prompt. COPRO would find the optimized instruction string which would work best. The LM used to teach was gpt-4o-mini.
These were choosen over MIPRO as it was suggested that you should have 100–200 training set to use MIPRO, while in this example I only used a 30–40 example trainset.
The uncompiled version’s performance on the metric was 66.7. Here is the performance improvement due to BootstrapFewShotWithRandomSearch (BFSRS):

Want an expert to optimize your Large Language Model Program for you?
Reach out for help using this button:
BFSRS optimization yielded a 20% increase on the training data. These were the few shot examples it generated for the prompt:
Now let’s analyze COPRO, which would give use an optimized instruction string, not examples.
This is the instruction string suggested by COPRO
Thank you for reading, please subscribe to FireBirdTech for more updates, below is the link to the github repo for the Auto-Analyst.


